Aria interface guide
This is a preview feature. It may be subject to change or removal with no further notice.
To enable preview features, set com.unblu.platform.enablePreview to true.
For more information on preview features, refer to the Unblu release policy.
The Unblu Aria interface is where you manage your account’s AI-based features such as bots, suggestion sources, and conversation summaries. It’s also where you provide Unblu with the credentials it needs to access third-party AI services through APIs such as Google Vertex or Claude API.
Users with the necessary rights have an Aria entry in the Administration section of the Agent Desk user menu.
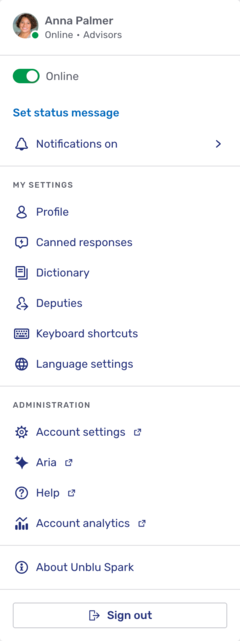
The Account Configuration interface gives direct access to the different sections of the Aria interface from the Aria section of the navigation sidebar.
Bot persons
A bot person represents a bot in conversations. It provides the name and avatar that participants see when the bot sends a message. For more information on bot persons and how bots use them, refer to Bot persons in Bot integration.
The Bot persons entry opens the bot person overview.
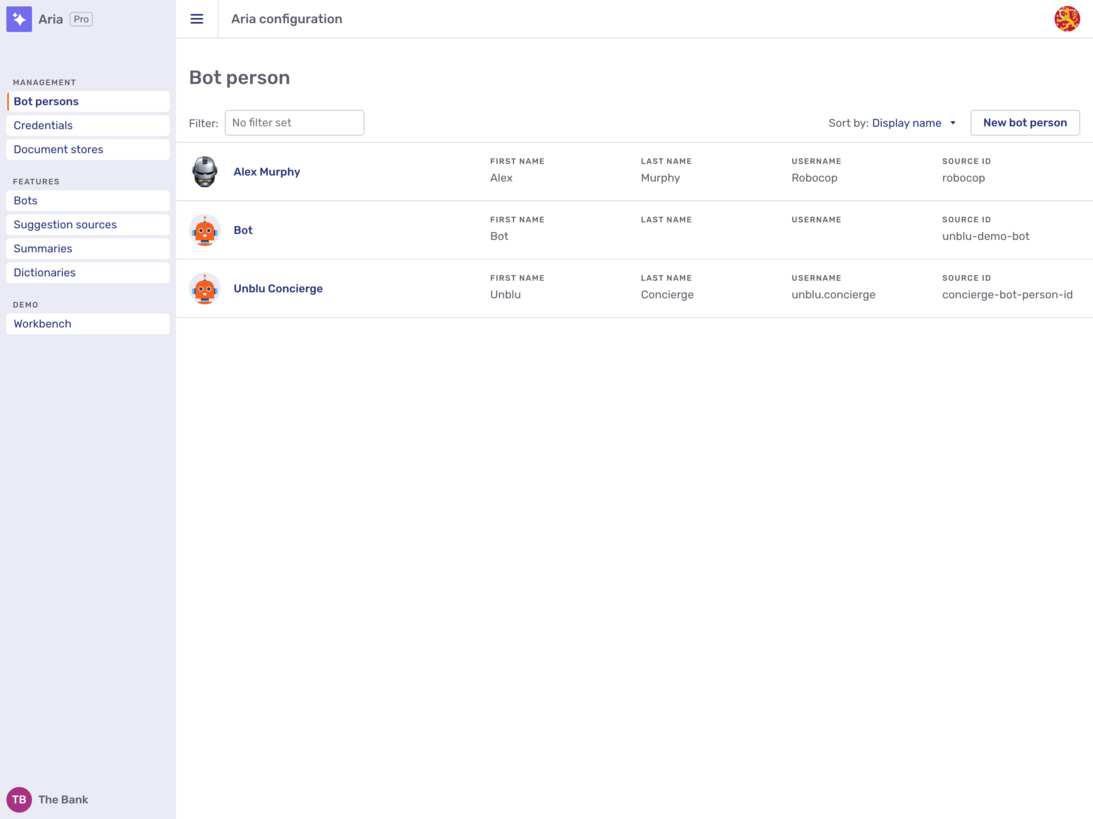
Each bot person, including the Concierge bot, is listed with its avatar, display name, first name, last name, username, and source ID. You can sort the list by any of these columns except the avatar.
To find a particular bot person, start typing in the filter field above the list; the list updates as you type.
New bot person
To create a bot person, click the New bot person button. This opens a fly-in page where you enter the details of the new bot person.
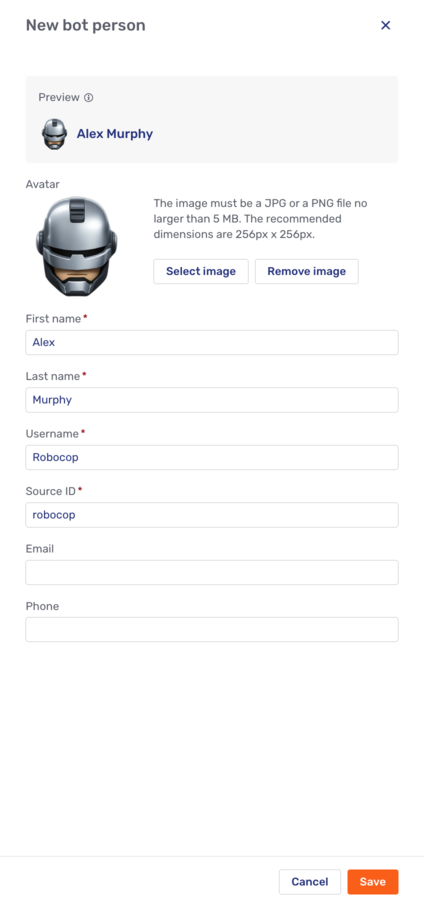
The fly-in page has the following fields:
- Avatar
-
The image displayed for the bot person. To add one, upload a JPG or PNG file no larger than 5 MB. The recommended size is 256 px by 256 px.
- First name
-
The bot person’s first name.
- Last name
-
The bot person’s last name.
- Username
-
The bot person’s username.
- Source ID
-
An identifier for the bot person.
You can only set the source ID when you create the bot person; afterward, it’s read-only.
-
The bot person’s email address. Unblu checks that the value is a valid email address.
- Phone
-
The bot person’s phone number. Unblu checks that the value is a valid phone number.
The First name, Last name, Username, and Source ID fields are required. The other fields are optional.
As you fill in the fields, the Display name preview shows how the bot person’s name appears in the conversation. The preview reflects the order in which Unblu evaluates the available name information, set in com.unblu.person.displayname.botDisplayNameEvaluationOrder. For more information, refer to Display name evaluation order.
When you’ve entered the details, click Save.
Credentials
The Credentials entry opens the credentials overview page. You can sort the list by name or by service.
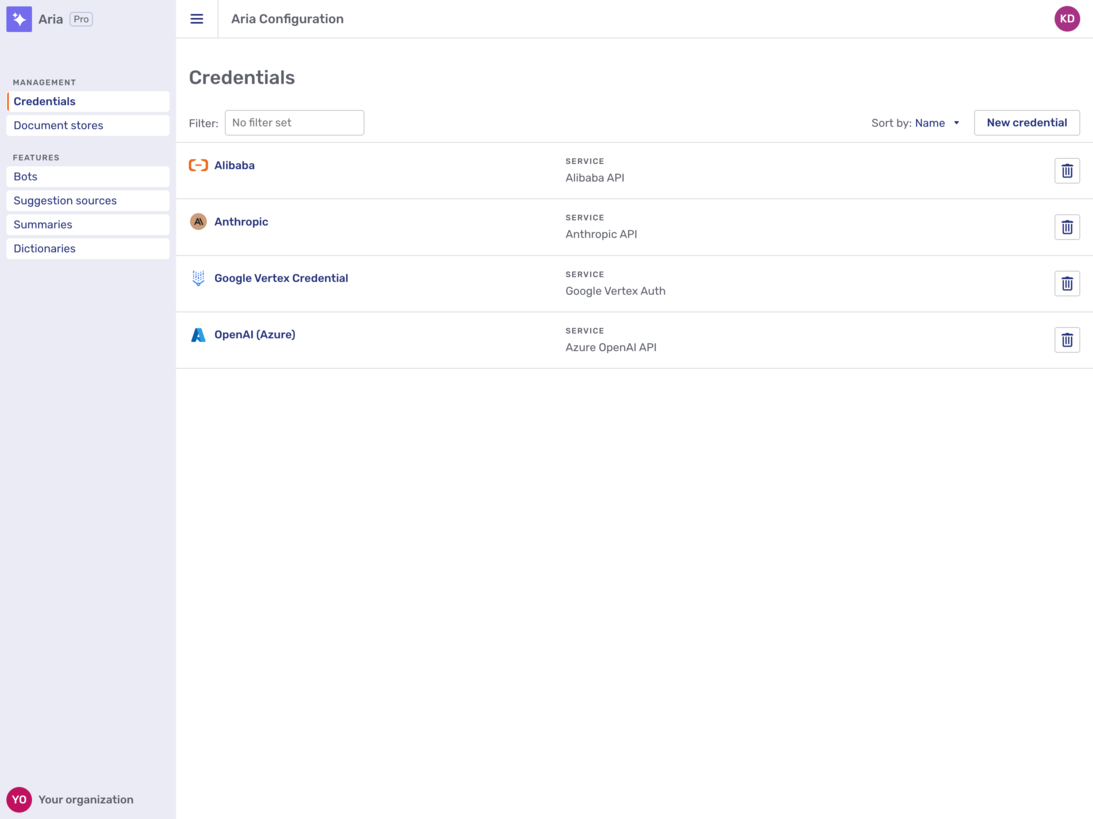
Credentials are listed with their name and the service they’re used for. Each entry in the list also has a delete button  . Clicking the button displays a confirmation dialog. Clicking OK in the dialog deletes the credential immediately with no means of undoing the action.
New credential
To add a new credential, click the Add credential button. This displays a list of all the services that Unblu Aria supports. Scroll to your service or start typing its name in the search field.
Once you find your service and click it, Unblu displays a fly-in page where you can enter the details of the credentials required by your service of choice. Since the credentials vary significantly from service to service, the fly-in page has different fields for different services.
When you’ve entered all the necessary information, click Save to save the credential.
Document stores
Clicking Document stores in the sidebar opens the document store overview. Document stores are how you configure sets of documents for Aria to use. You can add different document stores to your flows and then incorporate LLM-based agents that employ retrieval-augmented generation (RAG) techniques to generate answers or suggestions.
A document store can include documents from multiple sources. For example, you might add product sheets from multiple file stores as well as content that you scraped from your organization’s website.
Create a document store
To create a new document store, click the Add New button in the upper right-hand corner of the overview. This opens a modal dialog where you can enter the name of the new store and a description for it. Click Add to create the document store and close the modal dialog.
Add documents to the document store
When you create a document store, it’s empty. To add documents to a document store, follow the steps below.
-
Click the document store in the overview.
-
On the page for the document store, click Add Document Loader. A Document loader tells Aria where documents that you want to use are stored—on Google Drive or in an Amazon S3 bucket or project, for example—and how to access them.
-
Once you’ve entered all the necessary information for your document loader, click Process. (The information you have to provide varies depending on the type of loader you select.) Unblu uses the details you provide to retrieve the documents you specified, convert them into chunks, and add the chunks to the Aria database.
If you want to preview the chunks before processing the documents, click Preview Chunks. Unblu then displays the chunks it would create if you pressed Preview.
-
Clicking Process returns you to the document store’s page, where you see the document loader you just created.
Repeat the steps above for each document loader you want to add to your document store.
Upsert chunked documents
The final step in making your documents available to Aria is upserting them, that is, adding or updating them in the vector store so they can be used in your flows. To do so, proceed as follows:
-
Open the page of the document store that contains the documents you want to upsert.
-
If you want to upsert all the documents in your store, click the Upsert button at the top of the page. Alternatively, open the Options menu of the document loader for the documents you want to upsert, then click Upsert Chunks.
-
Select the credentials and the model that Unblu should use when creating the embeddings. You can specify other features of the embeddings, too.
-
Click Upsert to complete the process and see a record of the upsert that Unblu executed.
To check how Aria uses the documents, click Test retrieval and enter a query.
Bots
|
Only dialog bots can be configured in the Unblu Aria interface. Conversation-observing bots are integrated using webhooks. For more information, refer to Bot integration. |
The Bots entry in the sidebar opens the dialog bots overview.
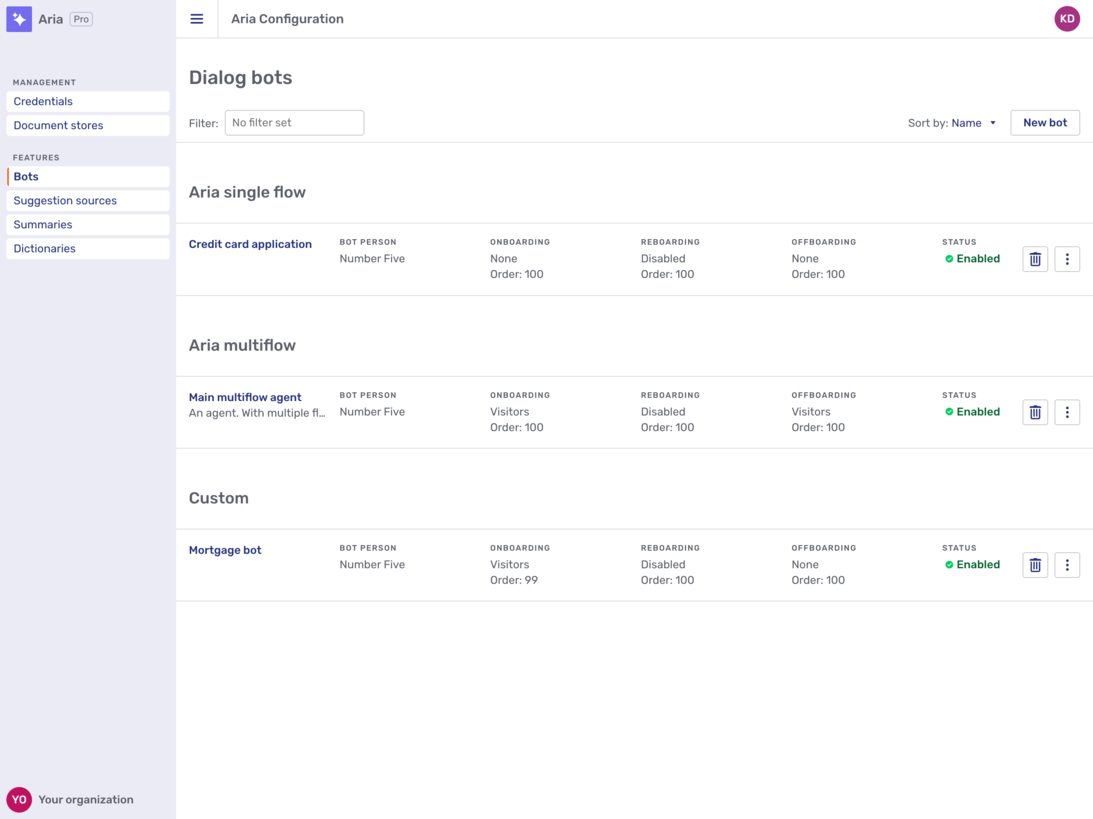
Each bot registered with the account is listed along with information regarding the person used by the bot as well as the filter and order used during onboarding, reboarding, and offboarding. You can also see whether the bot is enabled or not.
Dialog bots of the same type are grouped together:
-
Aria single flow
-
Aria multiflow
You can sort the lists by name, onboarding filter, onboarding order, offboarding filter, or offboarding order.
In the overview, each dialog bot has a delete button . Clicking the button deletes the bot immediately. The toast that appears at the top of the interface lets you undo the action.
The kebab menu  opens a context menu where you can access the bot’s delivery log tab directly. Depending on the type of bot, the menu also contains other entries:
-
Custom bots have a Send ping event to test the bot.
-
Microsoft Copilot bots have a Edit Microsoft Copilot agent menu entry that opens Microsoft Copilot Studio.
Clicking a bot in the list opens the bot’s General tab.
New dialog bot
To create a new dialog bot, click the New bot button and select the type of dialog bot you want to create:
-
Aria single flow agent dialog bots
-
Aria multiflow agent dialog bots
-
Custom dialog bots use Unblu web API endpoints and webhooks to interact with a conversation participant.
-
Microsoft Copilot agent dialog bots let Unblu Spark interact directly with an agent configured in Microsoft Copilot Studio.
Clicking a menu entry opens a fly-in page where you can configure your dialog bot.
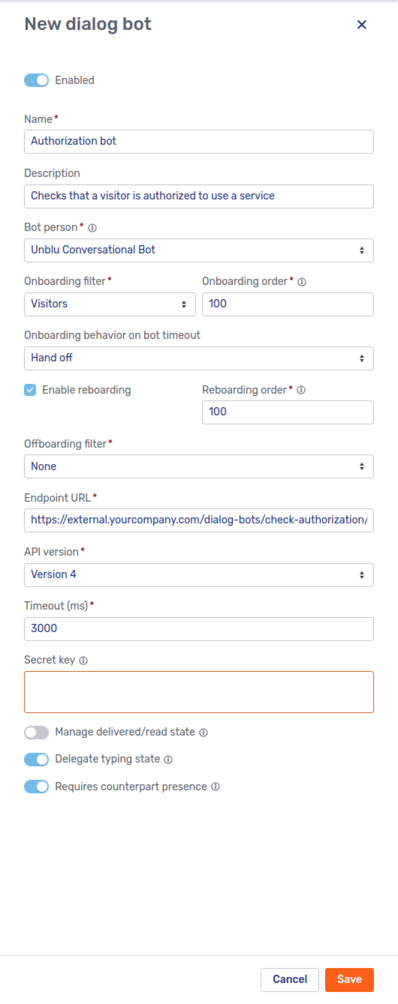
Some of the fields on the fly-in page are exclusive to one or another type of dialog bot, but many of the fields are shared by all types:
-
Enabled toggle:
A toggle to enable or disable the dialog bot. By default, the Enabled toggle is active, meaning that your new dialog bot is enabled as soon as you click Save.
-
Name:
The name of the dialog bot.
-
Description:
A description of the dialog bot.
-
Bot person:
The person that represents the bot in conversations. For more information, refer to Bot persons.
-
Indicator:
The kind of indicator to display so users know the bot is processing their request. Choose between
NONE,TYPING, andTHINKING.If you choose
THINKING, the fly-in page displays additional fields: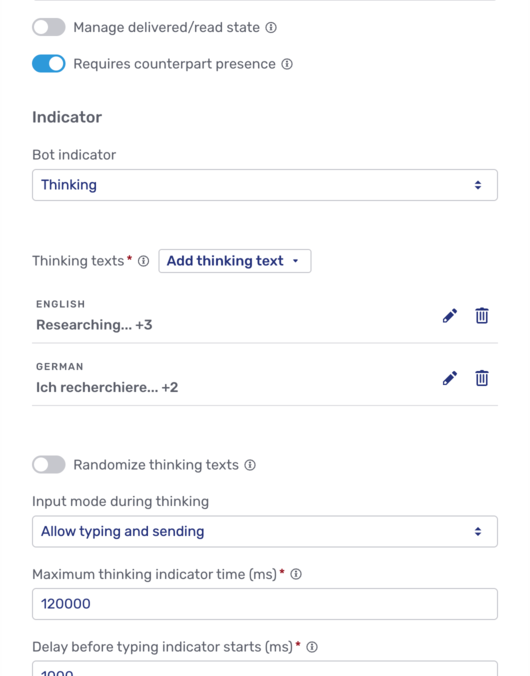 Figure 7. Thinking indicator fields in bot fly-in page
-
Thinking texts: The texts that the thinking indicator displays, grouped by language.
-
Randomize thinking texts: A toggle to randomize the order that thinking texts are displayed in. If off, thinking texts are displayed in the order they were entered.
-
Input mode during thinking: Specifies what users may do while the dialog bot is thinking. Choose one of the following options:
-
Allow typing and stopping
-
Allow typing and sending
-
Only allow typing, block sending
-
-
Maximum thinking indicator time (ms): Specifies how long at most Unblu should display the thinking indicator.
-
Delay before typing indicator starts (ms): Specifies how long Unblu should wait before displaying the thinking indicator.
-
Thinking indicator text cycle interval (ms): Specifies the interval between the different thinking texts as Unblu cycles through them.
Clicking the Add thinking text button next to Thinking texts displays the languages your Unblu account supports. Select the language you want to add thinking texts for to open the thinking text editor:
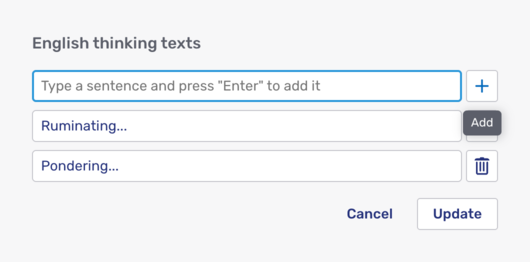 Figure 8. Thinking text editor
Add a thinking text and click the Plus icon
 to add it to the texts for that language. Once you’ve added all your thinking texts for the language, click Update.
 -
-
Onboarding filter:
The filter specifies whose onboarding the bot should join: Visitors, Agents, Both, or None.
-
Onboarding order:
If more than one bot takes part in a participant’s onboarding, the number you enter here determines the order in which bots are invited to participate in the process. A bot with a low number gets called before one with a higher number.
The field is only present if you select an onboarding filter other than None.
-
Onboarding behavior on bot timeout:
Specifies what Unblu should do if the bot takes too long to respond. Possible values are Abort and Hand off.
The field is only present if you select an onboarding filter other than None.
-
Enable reboarding:
Specifies whether the bot is triggered during reboarding.
-
Reboarding order:
A number to determine the bot’s place in the order of bots taking part in the reboarding process. Bots with lower numbers take precedence over ones with higher numbers.
The field is only present if Enable reboarding is checked.
-
Offboarding filter:
The filter specifies whose offboarding process the bot should join: Visitors, Agents, Both, or None.
-
Offboarding order:
Determines the bot’s position in the call order of bots taking part in the offboarding process. A lower number means the bot is called earlier.
The field is only present if you select an offboarding filter other than None.
-
Timeout (ms):
The time the dialog bot must respond in. If it doesn’t do so, Unblu treats the dialog bot as unreachable and disables it. Unblu no longer attempts to contact the dialog bot until you enable it again.
-
Requires counterpart presence:
If enabled, the boarding process doesn’t start until the bot’s counterpart (the visitor or agent) is online and has opened the conversation.
Enable if the dialog bot needs quick responses to its questions. Disable if the bot is used with external messengers; external participants don’t have an online state.
New Aria single flow agent dialog bot
The fly-in page for Aria single flow dialog bots only has the common fields.
New Aria multiflow agent dialog bot
In addition to the common fields, the fly-in page for Aria multiflow dialog bots initially displays one additional field:
-
LLM provider:
The provider of the large language model (LLM) used in flows based on this dialog bot.
Selecting an LLM provider displays additional fields for you to configure the provider’s parameters, such as the temperature or the credentials to use. Different LLM providers offer different parameters, so the fields displayed vary from provider to provider.
New custom dialog bot
Besides the fields listed above, the fly-in page for custom dialog bots contains the following fields:
-
Endpoint URL:
The endpoint URL called to invite the dialog bot to participate in a dialog.
-
API version:
The version of the Unblu web API that the dialog bot uses. Depending on your choice, Unblu uses webhooks or the outbound request mechanism to communicate with the dialog bot.
-
Secret key:
The key you enter here can be used to establish that the invitation was sent by the Unblu Collaboration Server. For more information, see secret key.
-
Manage delivered/read state:
If active, the toggle specifies that the dialog bot actively informs the Unblu Collaboration Server when a message addressed to it has been delivered or read. This state is reflected in the number and color of the ticks displayed next to the sent message in the UI the human participant sees.
If the toggle isn’t active, the state and thus the UI feedback is managed by the Unblu Collaboration Server.
-
Delegate typing state:
If active, Unblu displays a typing indicator while the dialog bot is preparing a response to messages the other party in the dialog sends. The typing indicator stops after 4 seconds or when the bot sends a response, depending on which event occurs first. The typing indicator has a 1 second debounce. This prevents it from being displayed repeatedly if the other party sends multiple messages in short succession.
If disabled, you can still display a typing indicator using the web API endpoints
/bots/startDialogBotTypingIndicatorand/bots/cancelDialogBotTypingIndicatorto start and cancel the typing indicator, respectively.Manually started typing indicators stop under the same conditions as automatically started ones: after 4 seconds, or when the dialog bot sends a response.
New Microsoft Copilot agent dialog bot
Beside the fields shared by all dialog bots, the fly-in page for Microsoft Copilot dialog bots has the following fields:
-
Endpoint URL:
The Direct Line API 3.0 endpoint that Unblu Spark uses to communicate with the agent.
-
Authentication token:
The authentication token that identifies the agent.
-
Microsoft Copilot agent ID:
-
Microsoft environment ID:
Refer to Configuring Microsoft Copilot agents in Unblu Spark for information on where you can find the values you need to enter and advice on configuring Microsoft Copilot agents.
Existing dialog bots
Clicking the listing of a dialog bot on the bot overview page displays that bot’s details, distributed across two or three tabs, depending on the type of bot:
-
All dialog bots have a General and a Delivery log tab.
-
Aria single flow agent dialog bots have a Flow canvas tab.
-
Aria multiflow agent dialog bots have an Agentic flows tab.
General
The General tab lets you modify the same fields as the fly-in page used to create a new dialog bot. For more information, refer to the description of the latter in the preceding sections.
Delivery log
The Delivery log tab contains the same information as the delivery log tab for webhooks. For more information, refer to the description of the latter.
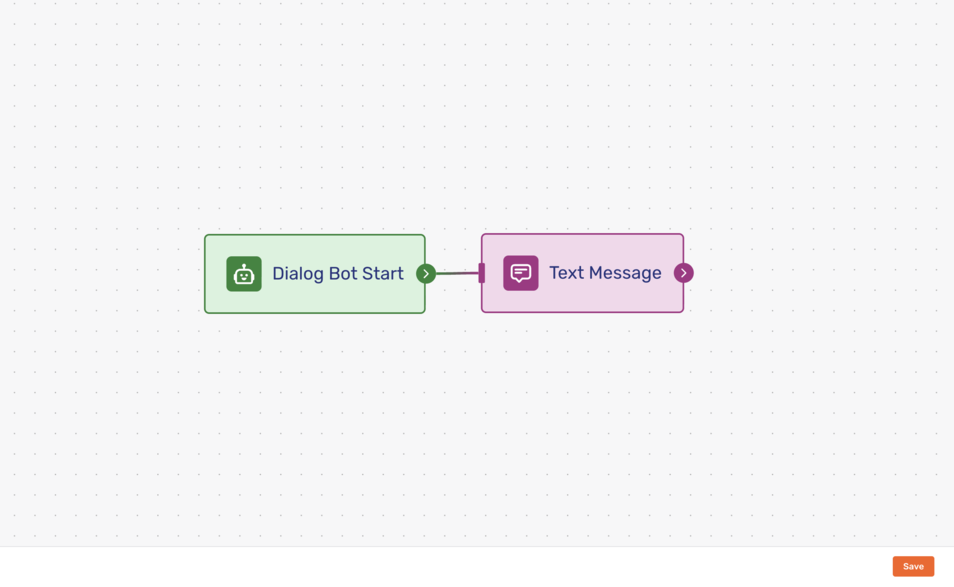
Flow canvas
Aria single flow agents have a Flow canvas tab. It’s where you specify the steps that the agent should work through.
Clicking a node displays a UI element with three buttons:
-
The Delete button
deletes the node.When you click the button, Unblu deletes the node immediately. There is no warning and no way to undo the action.
-
The Copy button
 duplicates the node and adds it to the canvas.
 -
The Info button
 displays all the node’s information in a modal window. The type of information displayed depends on the type of node.
Double-clicking a node opens a modal window where you can edit the node. The type of node determines which aspects of the node you can edit.
To close the info or editing modal window, click the canvas outside the modal window.
For Unblu to process a flow’s nodes in the correct order, you must connect them. To do so, click and hold the connector icon ![]() on the right edge of the first node and drag it to the docking bar on the left edge of the next node in your flow.
on the right edge of the first node and drag it to the docking bar on the left edge of the next node in your flow.
To delete a connection, click the connection. This displays the delete connection  button on the connection between the nodes. Click it to remove the connection.
Once you’ve finished editing your flow, click Save. If you don’t, all your changes are lost when you navigate away from the flow canvas.
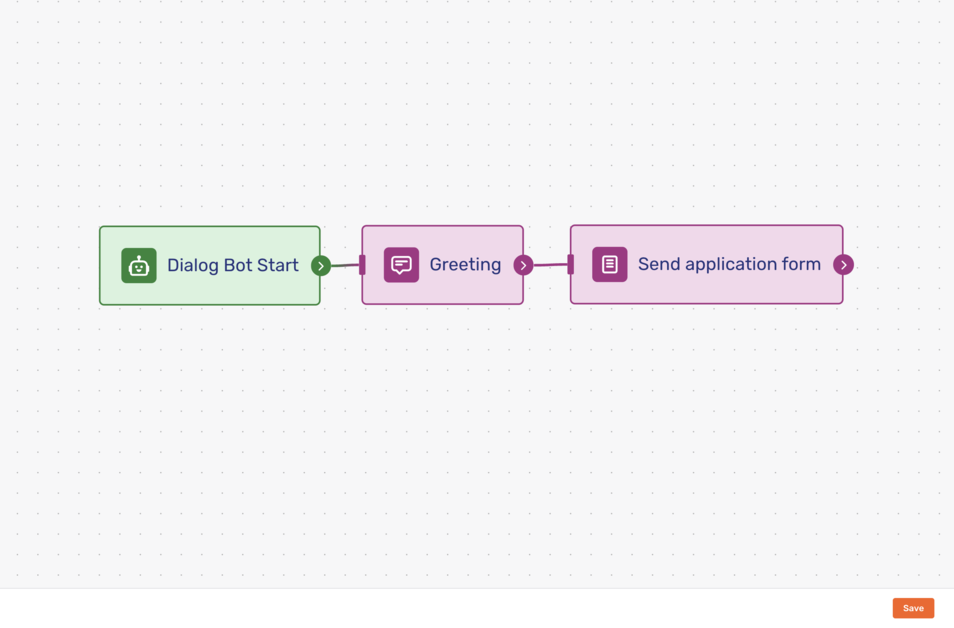
Agentic flows
Aria multiflow agents have an Agentic flows tab that lists all the flows available to the agent in question. The agent selects the most appropriate flow to run based on the input it receives.

All multiflow agents have two flows in the Default section, Fallback and Greeting. Their purpose is pretty self-explanatory. You can’t rename the default flows, delete them, or change their scenarios, but you can edit them by clicking them. This opens the flow’s Flow canvas.
The agentic flows that you add to the agent appear in the Custom section. To create a new flow, click the Add agentic flow button and choose one of the options below to open the fly-in page where you enter the new flow’s details:
- Add new
-
Select this option to create a new agentic flow from scratch. On the fly-in page, enter the name of the new flow and the scenario that the agent should use the flow in.
- Use existing agentic flow
-
Select this option to reuse an existing flow. On the fly-in page, select the existing custom flow you want to use and enter the scenario that the agent should use the new flow in.
The existing flow isn’t duplicated. Any changes you make to the flow here are reflected everywhere the flow in question is used.
Once you’ve entered all the required information, hit Enter or click Save to complete the process.
To create or modify steps in your flow, open its Flow canvas by clicking it. The canvas has the same features as the one used for Aria single flow agents described above.
All custom flows have a delete button . Clicking it opens a modal dialog asking whether you really want to delete the flow. If you click OK, Unblu deletes the flow. There is no way to recover a deleted flow.
Suggestion sources
Suggestion sources provide agents with possible responses to text messages in chats with visitors or other agents.
The Suggestions sources navigation menu item opens the suggestion source overview.

You can see the name, description, endpoint, timeout, and status of each suggestion source configured for the account. Each entry in the overview sports a delete button and a kebab menu .
Clicking the delete button deletes the custom action immediately. The toast that appears at the top of the interface lets you undo the action.
The kebab menu opens a context menu where you can open the suggestion source’s delivery log tab or send it a ping event. For Microsoft Copilot suggestion sources, there’s also an entry labelled Edit Microsoft Copilot Agent. Clicking it opens Microsoft Copilot Studio.
The New suggestion source button opens a context menu where you can select the type of suggestion source you want to add, Aria, Custom, or Microsoft Copilot. Clicking one of the choices opens a fly-in page with the same configuration options as an existing suggestion source’s General tab, described below.
For more information on chat suggestions, refer to Providing agents with suggestions in text chats.
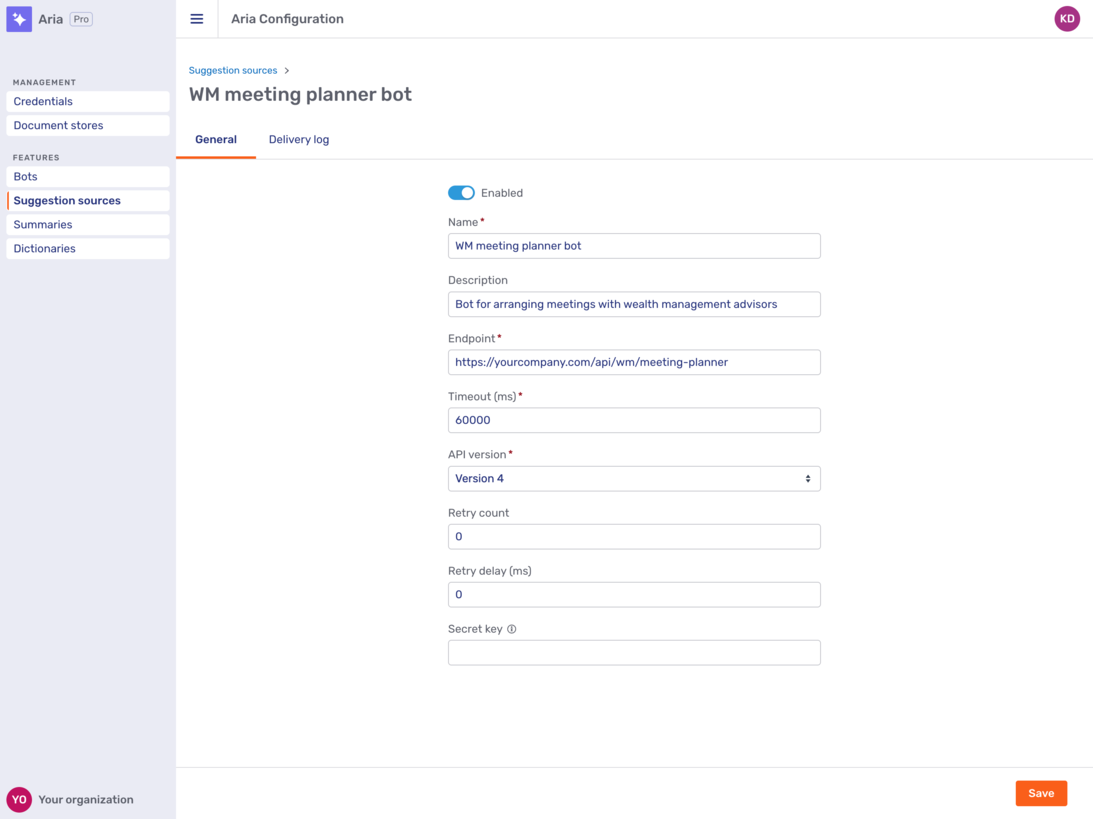
General
Clicking a suggestion source opens its General tab. For custom suggestion sources, the tab looks like this:
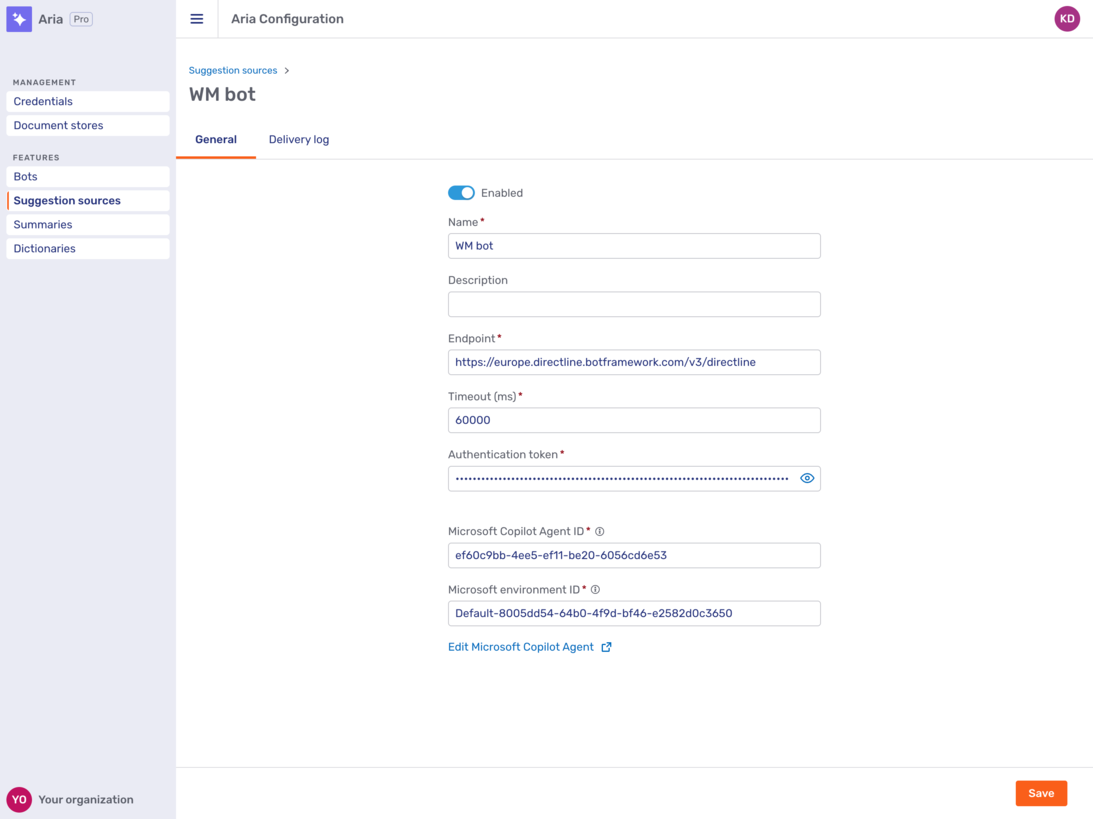
The General tab of a Microsoft Copilot suggestion source looks like this:
All suggestion sources have a toggle to enable them as well as the following settings:
- Name
-
The suggestion source’s name.
- Description
-
The suggestion source’s description.
- Endpoint
-
The endpoint URL Unblu uses to request chat suggestions.
- Timeout (ms)
-
If the suggestion source takes longer than this timeout to respond to Unblu’s request for a suggestion, the suggestion source is automatically disabled.
For agents that use generative AI for suggestions, you should set the timeout to 15000 ms or more.
Custom suggestion source
Custom suggestion sources have the following additional settings:
- API version
-
The version of the Unblu web API that the suggestion source targets.
- Retry count
-
The number of times
- Retry delay (ms)
- Secret key
-
An optional secret key the suggestion source can use to verify that the request for a suggestion did indeed come from Unblu.
Microsoft Copilot suggestion source
Microsoft Copilot suggestion sources have the following additional settings:
- Authentication token
-
The authentication token needed to access the agent
- Microsoft Copilot Agent ID
-
The Microsoft Copilot Agent ID (referred to as the Copilot Id in Microsoft Copilot Studio)
- Microsoft environment ID
-
The Microsoft environment ID
The link labelled Edit Microsoft Copilot Agent takes you straight to the agent in Microsoft Copilot Studio.
Dictionaries
The Dictionary page lets you manage the dictionaries the spellchecker uses. It has two tabs, Account dictionary and Custom dictionary.
Account dictionary
The Dictionary page opens on the Account dictionary tab. The account dictionary is the shared list of words the spellchecker accepts in addition to the standard language dictionaries.
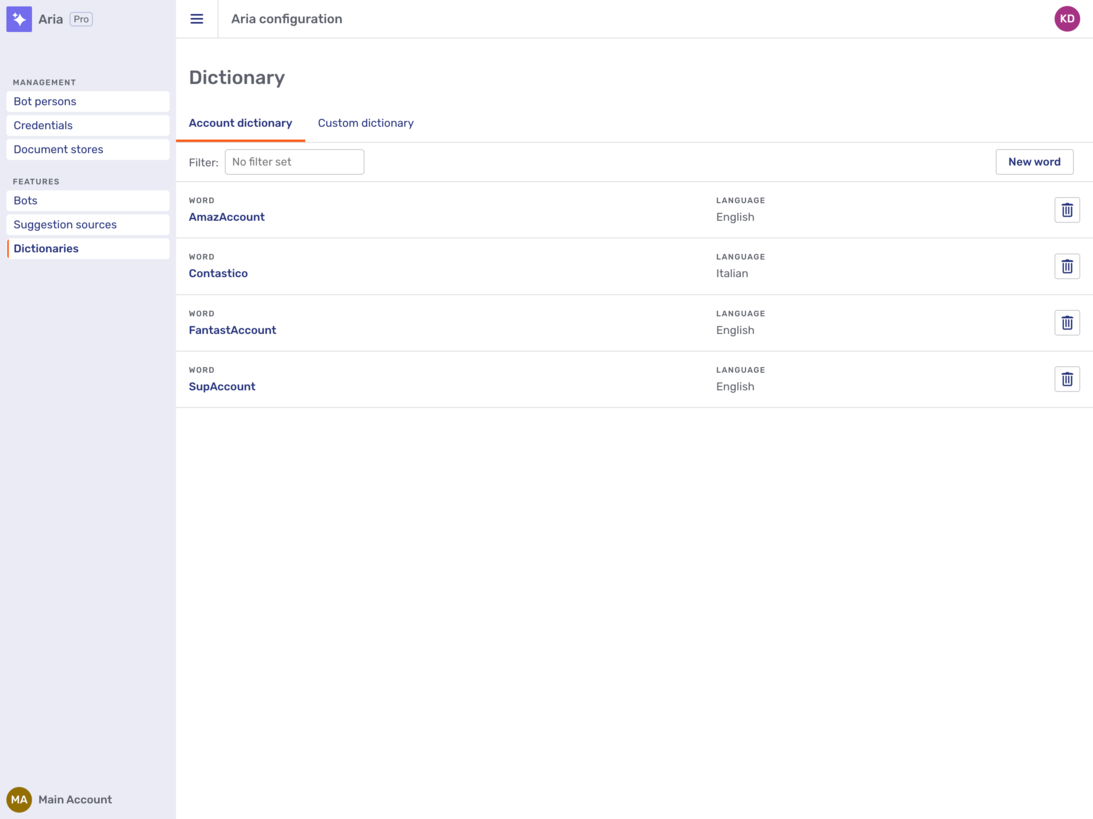
On this tab, you can:
-
Add words.
Click New word to open the Add words fly-in page, optionally select a language, then type words or upload a CSV file. After typing a word, click the
+icon to add it to the list of words to save.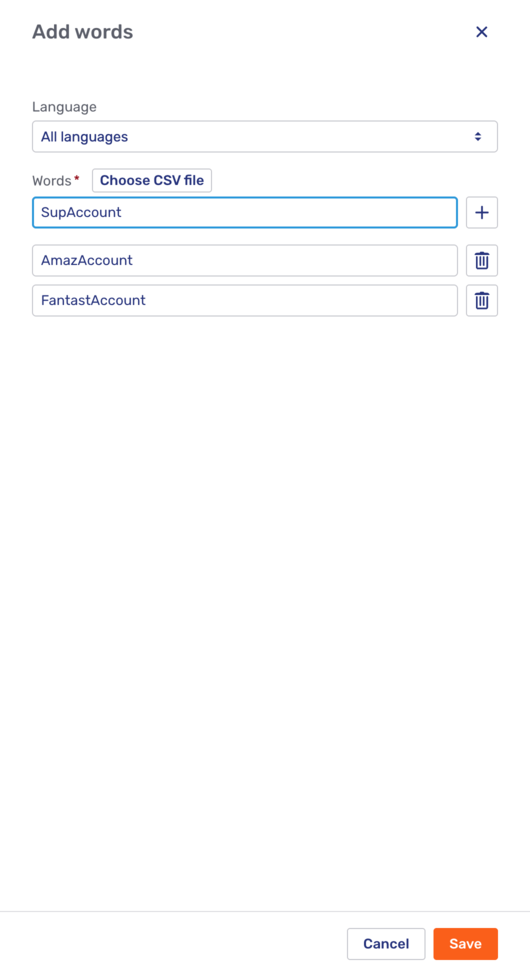 Figure 16. The Add words fly-in page
 -
Delete a word.
Each word has a delete button
. Clicking it deletes the dictionary entry immediately. A notification with a link to undo the deletion then appears.
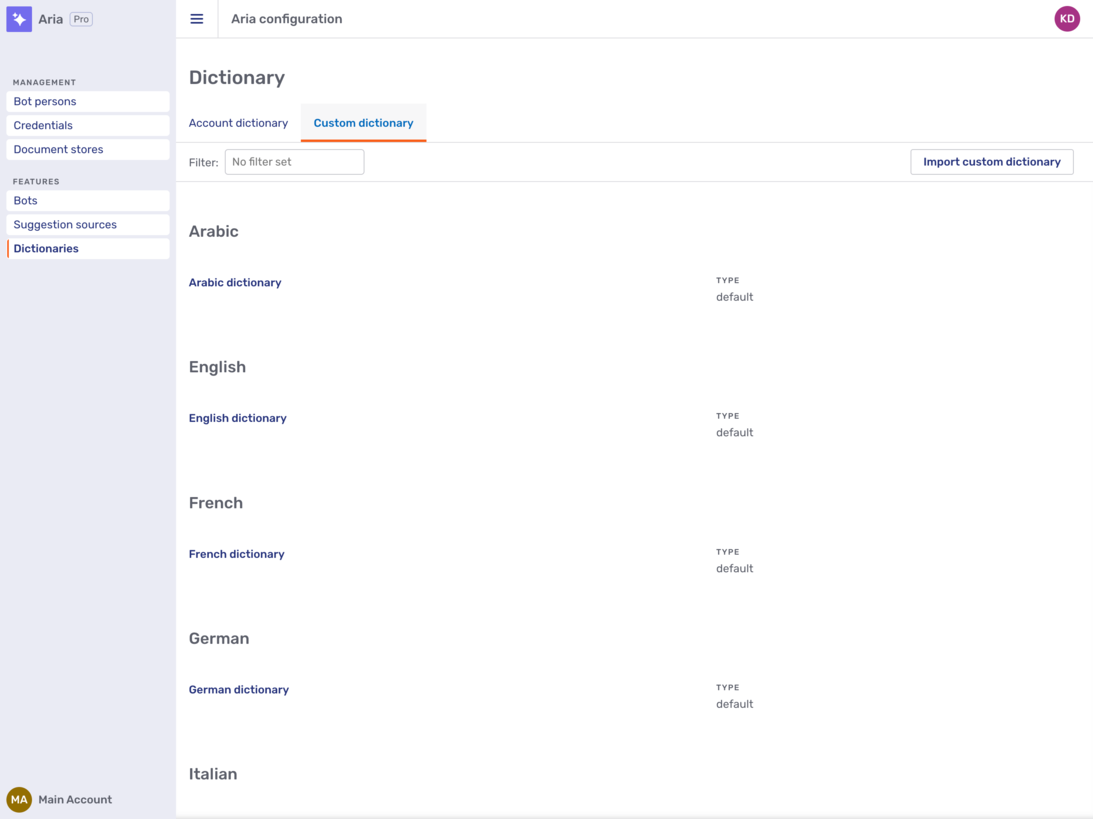
Custom dictionary files
You can replace the dictionary for a supported language, or add a dictionary for a supported language that doesn’t ship with one, by uploading custom Hunspell dictionary files. Upload them on the Custom dictionary tab of the Dictionary page. The tab lists each supported language, along with the dictionary currently in use and its type.
To import a custom dictionary, click Import custom dictionary, select the language, and choose the affix (.aff) and dictionary (.dic) files. You can also add an optional description.
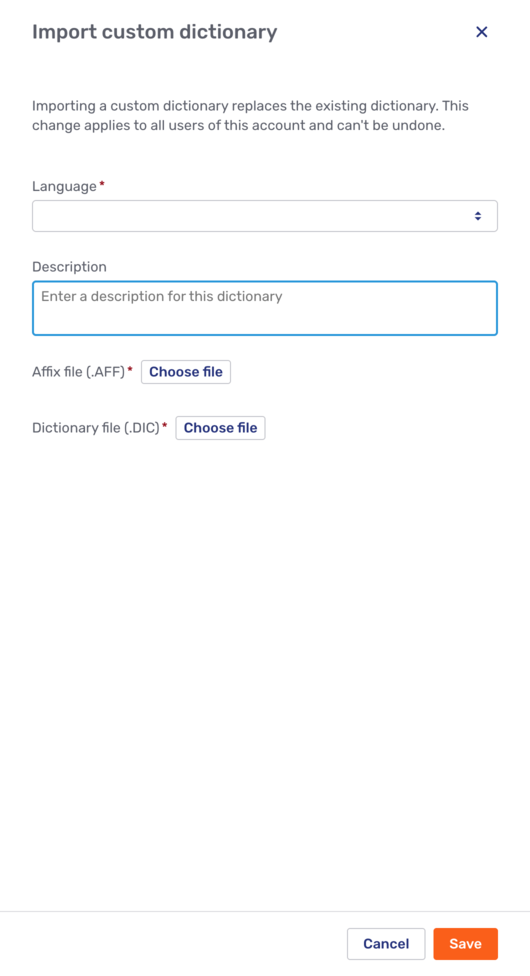
The custom dictionary for a language requires two files:
-
An
.afffile.The
.afffile defines the grammatical rules of the language, including how to handle prefixes, suffixes, plurals, and tenses. -
A
.dicfile.The
.dicfile contains a list of root words. Rather than listing every form of a word (for example, walk, walked, walking, walks), it lists the base word with flags that point to grammatical rules.
Importing a custom dictionary replaces the existing dictionary for that language for all users in the account.
To remove a custom dictionary, click the Reset button  on the language’s entry in the custom dictionary overview. This reverts to the default dictionary for the language.
Where to find dictionary files
Since Hunspell is open source, dictionary files are available for most languages. Search for a term such as "Hunspell <Language Name> dictionary" to find them.
Recommended sources:
-
LibreOffice Dictionary Repository — A large, community-maintained collection covering many languages and regional dialects.
-
Chromium Hunspell Dictionaries — The dictionaries used by Google Chrome.
-
Wooorm’s UTF-8 Dictionaries — A collection of dictionaries with consistent UTF-8 encoding.
Always check the license of the .dic and .aff files to ensure they’re compatible with your intended use.
Summaries
Conversation summaries are generated based on summary templates which describe how to generate a summary. The Summaries navigation menu item opens the overview of summary templates.
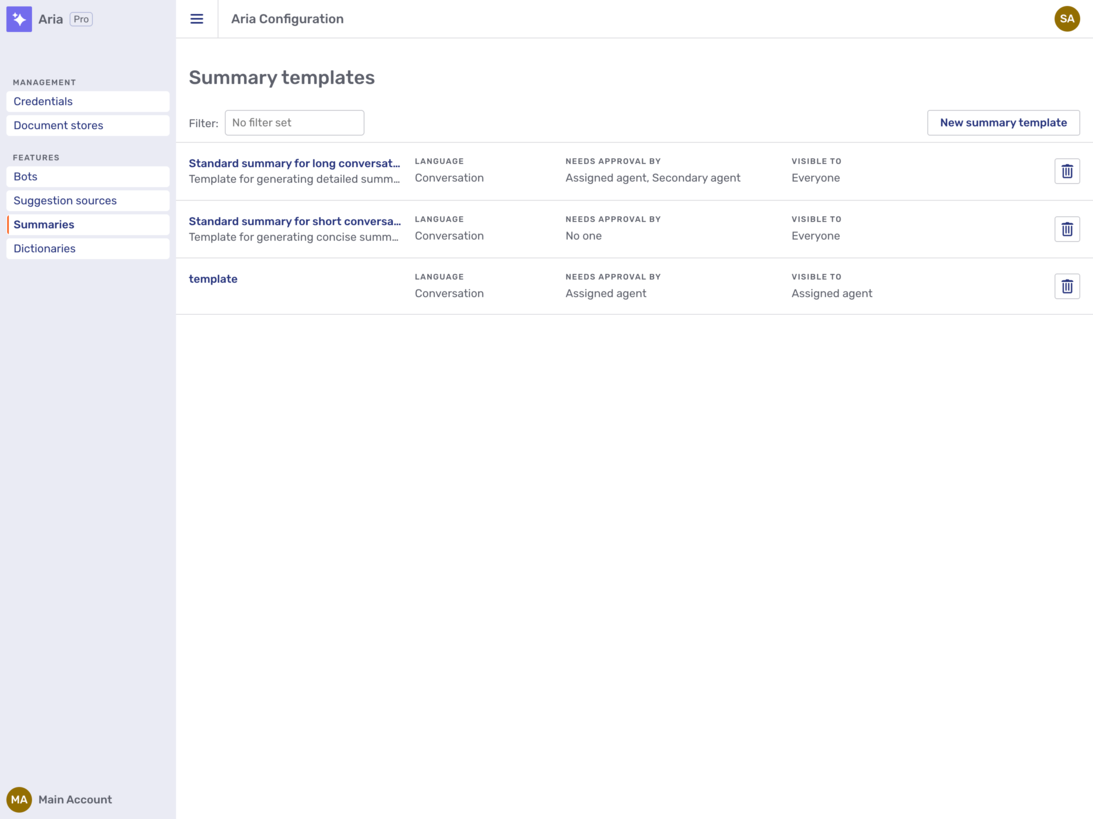
For each summary template, the overview page shows the following information:
-
The summary template’s name and description.
-
The language that summaries based on the template are generated in.
-
Who may approve the summary.
-
Who may see the summary.
-
A delete button
.
Clicking the delete button displays a modal dialog:
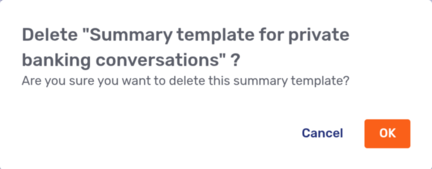
Clicking OK deletes the summary template. There’s no way to undo the deletion.
To create a new summary template, click the New summary template button. This opens a fly-in page with the same fields as the General tab, described below, of an existing summary template.
General
Clicking a summary template opens its General tab:

Each summary template has the following properties:
- Name
-
The name of the summary template
- Description
-
A description of the summary template
- Language
-
The language that summaries based on this summary template are generated in. You can either choose a specific language or opt to generate the summary in the conversation language.
- Minimum character count
-
The minimum character count to trigger a summary. If a conversation consists of fewer characters, Unblu doesn’t generate a summary.
- Timeframe
-
The timeframe to take into account when generating a summary. Choose one of the following timeframes:
-
The whole conversation.
This takes into account all messages of the conversation, including the onboarding phase.
-
The whole conversation without onboarding.
-
Until last summary.
If a summary was generated earlier in the conversation, the summary starts when the last summary ended.
-
Until last unassigned.
With this timeframe setting, the summary starts when the assigned agent last left the conversation. This option is most likely to be of interest in long-running conversations.
-
Trigger specific
-
- Include internal message
-
Take into account internal messages when summarizing the conversation
- Include onboarding messages
-
Include messages sent during onboarding when summarizing the conversation
- Include offboarding messages
-
Include messages sent during onboarding when summarizing the conversation
- Include reboarding messages
-
Include messages sent during reboarding when summarizing the conversation
- Summaries are visible to
-
Which participant types summaries are visible to. You can grant access to the following participant types:
-
The assigned agent
-
Secondary agents
-
Ghost participants
-
- Review required
-
If you switch the toggle on, the summary must be reviewed before it’s saved. Depending on when in the conversation lifecycle the summary is generated, this may mean that the conversation doesn’t end until the summary’s been reviewed.
If the toggle is on, you must specify the participant types allowed to review the summary in the Review by field.
- Review by
-
Which participant types may review the summary. This field is only displayed if the Review required toggle is on. You can make the following participant types reviewers:
-
Assigned agent
-
Secondary agents
-
Ghost
Make sure that reviewers can see summaries according to the Summaries are visible to field.
-
Prompt
The Prompt tab lets you customize the prompt to use when generating a summary based on the template you’re viewing.
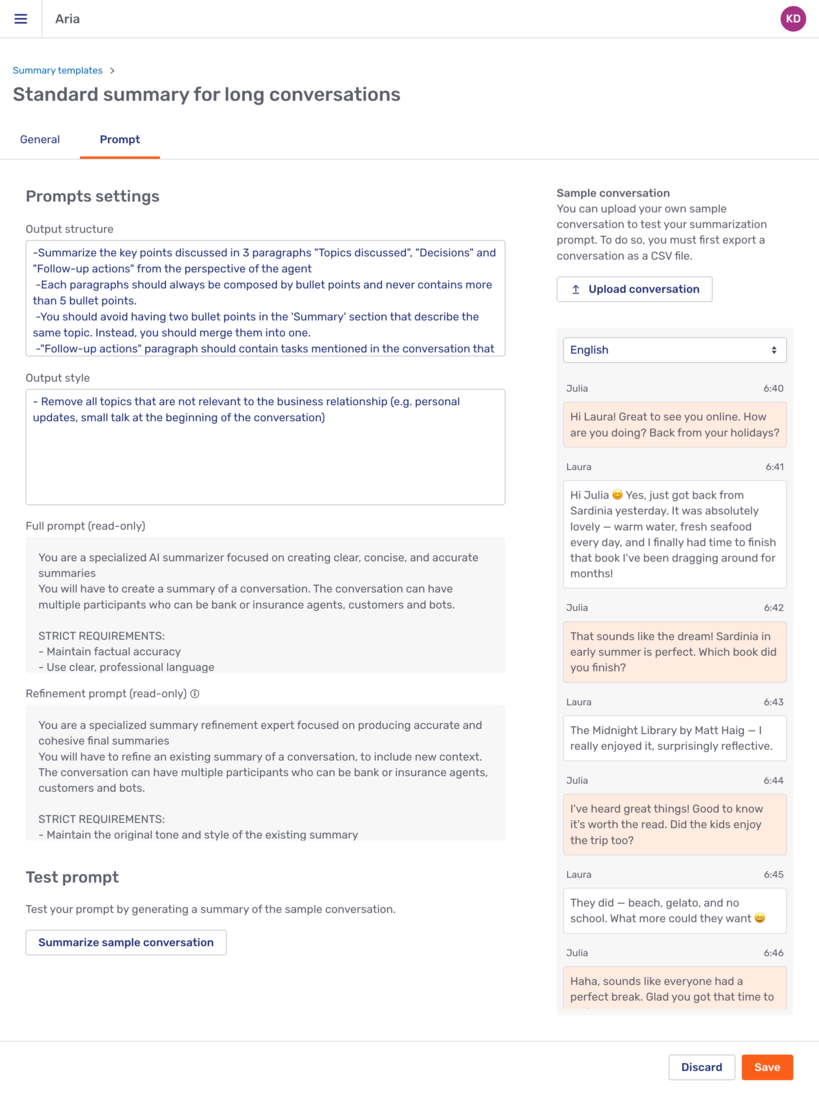
You can customize two aspects of the prompt:
-
Output structure, which replaces the
\{{promptCustomization}\}placeholder in the prompt configuration property. -
Output style, which replaces the
\{{promptStructure}\}placeholder in the prompt configuration property.
The parts of the prompt that you can’t customize on the prompt tab are defined in com.unblu.ai.conversation_summary.refineSummaryDefaultPrompt. Beneath the two input fields, you see the complete initial and refinement prompts with your customizations.
For more information on the different prompts, refer to Define the prompt used for summarization in Generate conversation summaries.
The Test prompt section beneath the prompts lets you test your prompt with the sample conversation you see on the right of the tab. You can upload a conversation of your own to test your prompts by clicking the Upload conversation button above the sample conversation. Note that the file you upload must be in the CSV format used by Unblu to export conversations.
See also
-
For more information on bots in Unblu Spark, refer to Bot integration and Dialog bots.
-
For more information on configuring suggestion sources, refer to Providing agents with suggestions in text chats.
-
For information on using chat suggestions as an agent, refer to Requesting chat suggestions in the Agent Desk guide.
-
For information about using Microsoft Copilot with Unblu Spark, refer to Creating Microsoft Copilot Studio agents for Unblu Spark. For information about using Microsoft Copilot as a suggestion source, also refer to Using Microsoft Copilot Studio agents as chat suggestion sources.