Adding functionality to Unblu with custom actions
Unblu gives you many different ways to integrate Unblu into your existing software environment. With custom actions, the opposite is possible: you can integrate features of other software your organization uses into Unblu. This lets you give your employees and customers a single environment to work in, helping them to achieve their goals faster and with less hassle.
What’s a custom action?
A custom action has two parts:
-
An action of some kind that you want users to be able to trigger. This action can be a real-time webhook, an event in one of the Unblu JavaScript APIs or mobile SDKs, or an Aria flow. It can be related to a conversation as a whole, a person taking part in the conversation, or a message in the conversation.
-
A UI element for users to trigger the custom action. The UI element is a button with an icon that you provide when you create the custom action.
Types of custom action
There are three types of custom action:
-
Custom conversation actions triggered on a conversation. A support desk agent might use a custom conversation action to forward a transcript of a conversation to the customer’s relationship manager.
-
Custom person actions triggered on a participant in a conversation. For example, you could create a custom person action that lets agents open a participant’s portfolio in their CRM application.
-
Custom message actions triggered on messages in a conversation. For example, a relationship manager could use a custom message action on a file message to trigger an electronic signature process. If a custom message action supports it, participants can also invoke the action on multiple messages at once. For more information, refer to Invoking a custom message action on multiple messages below.
The examples given above are all rather simple, but you can create more complex workflows. The endpoints in the Bots section of the Unblu web API, for example, let you guide participants through a process once it’s been triggered by a custom action. Alternatively, a custom action can run an Aria flow that carries out the steps for you.
Creating custom actions
You can create custom actions in the Aria interface or with the /customactions/create endpoint of the Unblu web API.
| To use a custom action you’ve created, you have to enable it in the conversation templates you want it to be available in. For more information, refer to Enabling and disabling custom actions below. |
Selecting the custom action type
In the Aria interface, the type of custom action to create is determined by the option you select after clicking the New custom action button.
When calling /customactions/create, you include one of CustomConversationActionData, CustomMessageActionData, or CustomPersonActionData in the body of the request. Each of the schemas includes a type field that determines the type of custom action Unblu creates. If, for example, you pass a CustomPersonActionData with type set to CONVERSATION in the body of your call, Unblu creates a custom conversation action. Any fields that aren’t relevant for custom conversation actions are ignored.
Basic options
-
By default, new custom actions are enabled. To disable a custom action, click the Enabled toggle, or set the field
statetoINACTIVE. -
The Key is the custom action’s unique identifier. It’s used to identify the custom action in events sent to the APIs or webhooks.
-
The Icon and Name are displayed in the agent and visitor UIs. Both are mandatory.
-
The Description is optional.
-
You can provide translations of the name and description by clicking the Add translations button.
The Triggered on section
The Triggered on section defines what you want the custom action to do. Its Events triggered block lists the available triggers under three subheadings: API event, Webhook event, and Aria. Select at least one trigger.
Under API event, the custom action can trigger an event in the Agent mobile SDK, the Agent embedded JS API, the Visitor mobile SDK, the Embedded JS API, the Floating JS API, or the Branch client JS API. If you select any of them, you must also set the API event trigger filter, which determines who the event is triggered for. The following options are available:
-
SELFtriggers the event for the user who invoked the custom action. -
OTHERStriggers the event for all conversation participants except the user who invoked the custom action. -
ALLtriggers the event for all conversation participants. -
TARGET_PERSONtriggers the event for the person the custom action was invoked on. This option is only available for custom person actions. -
SENDERtriggers the event for the person who sent the message that the custom action was invoked on. This option is only available for custom message actions.
Under Webhook event, select Webhook to have Unblu deliver the event to an endpoint of your own. Specify the Endpoint URL to deliver the event to, the API version to use, and, optionally, a Secret key you can use to verify the origin of the event.
Under Aria, select Aria flow to have the custom action run an Aria agentic flow. The option is only available if your license includes Aria Pro. For more information, refer to Triggering Aria flows with custom actions.
System messages for custom actions
By default, Unblu sends a system message when a user triggers the custom action.
To disable system messages for custom actions, clear the option in the Aria interface. In calls to /customactions/create, set the field triggerSystemMessage to false.
Who can see these system messages is determined by com.unblu.conversation.message.allowSeeGeneralSystemMessagesForCustomActions and com.unblu.conversation.message.allowSeePersonalSystemMessagesForCustomActions, both of which are in the CONVERSATION_TEMPLATE scope.
The Accessible to section
The Accessible to section specifies who’s allowed to invoke the custom action. You can restrict the use of a custom action to one or more types of participant.
The Active in section
The Active in section defines when a custom action can be invoked. You can restrict the possibility to invoke a custom action based on the conversation state and the participation state of the user who wants to invoke the custom action.
The Available in section
The Available in section specifies the user interfaces that the custom action should be available in. If you have a custom action that launches a mobile app, for example, there’s little point in displaying it in the Agent Desk.
The options for visitor interfaces are Floating Visitor UI, Embedded Visitor UI, Visitor Desk, Visitor mobile, and Visitor pop-out. The options for agent interfaces are Agent Desk, MS Teams Agent Desk, Agent Single Conversation Desk, Agent embedded integration, and Agent mobile. There’s also Branch client.
The custom action is only available in a user interface if the type of participant using that interface is allowed to invoke it, as specified in The Accessible to section.
The Sort order defines where the custom action should appear in the list of available (predefined and custom) actions. The order of actions with the same sort order is undefined.
Some aspects of the Available in section only apply to certain types of custom action:
-
For custom conversation actions, the Action bar display mode specifies how the action should appear in the action bar. Choose between Always in overflow, Always show, and Show if possible.
-
For custom message actions, Message types lets you specify which message types the action should be available on. Messages sent by allows you to limit the action to messages sent by certain participants.
If Supports multiselect is checked, participants can invoke the action on multiple selected messages at once. In calls to
/customactions/create, set the fieldsupportsMultiSelecttotrue. By default, custom message actions don’t support multiselect.
The Target section
The Target section is only available for custom person actions. It lets you specify which types of participant the custom action should be available for. You can further restrict custom person actions to be available only when the target person is using a certain entry point.
If you select a target entry point for the custom person action, agents can only invoke the action on participants who are online with the entry point specified.
If you don’t select a target entry point, agents can also invoke the action on participants who are offline.
Enabling and disabling custom actions
To make a custom action available to users, add it to the configuration property com.unblu.conversation.availableCustomActionIds.
If you want to enable all custom actions, use com.unblu.conversation.enableAllCustomActions instead. This overrides any selection made in the previous configuration property.
You can temporarily disable a custom action by clicking the Enabled toggle in the Aria interface or by calling the /customactions/update endpoint with the state field set to INACTIVE.
If a custom action triggers a webhook event and the webhook delivery fails, the custom action’s state is automatically set to INACTIVE_UNAVAILABLE.
Disabled custom actions are no longer available in new and ongoing conversations.
Invoking custom actions
Custom actions of a given type are displayed in the same place as predefined actions of the same type. The location depends on the user interface they’re displayed in, but the Agent Desk can serve as an example:
-
Custom conversation actions appear in the action bar or in the action bar overflow menu
 , depending on the action’s display mode.
 -
Custom message actions appear wherever you can trigger an action on a message:
-
When you hover over a message they can be invoked on.
-
When you enlarge an image uploaded to a conversation.
-
In the overview of All shared files in a conversation.
-
-
Custom person actions are listed in the participant information popup of participants they can be invoked on.
Invoking a custom message action on multiple messages
To invoke a custom message action on multiple messages, you need a suitable custom action and permission to select messages:
-
The custom action must have Supports multiselect checked in the Available in section.
-
The configuration property com.unblu.conversation.message.allowMultiSelectMessages must include your participant type. By default, the list is empty. The property is available in the conversation and conversation template scopes.
To start selecting messages, hover over a message and click the Select icon  . Doing so selects the message and activates multiselect mode. Alternatively, click Select messages to activate multiselect mode without selecting a message. The option is available in the Agent Desk control bar and in the conversation action bar.
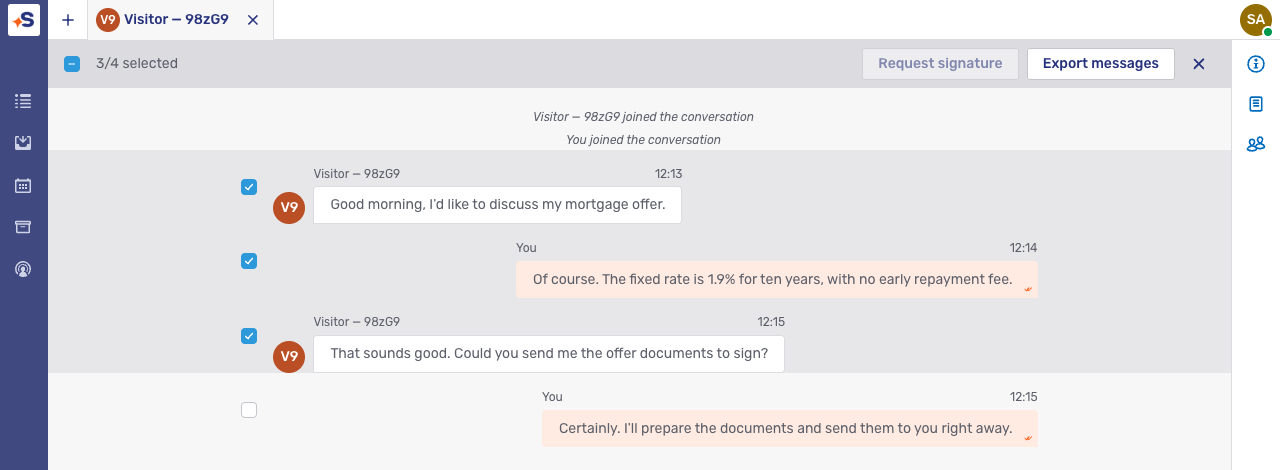
In multiselect mode, Unblu displays a checkbox next to each message you can select. You can’t select system messages or messages in bot threads.
Unblu also hides the message input and displays the multiselect control bar above the list of messages. The control bar contains the following elements:
-
A checkbox to select all messages, up to a limit of 100, or to clear the selection.
-
The number of messages you’ve selected.
-
A button for each custom action that supports multiselect. To invoke an action on the selected messages, click its button. The button is only enabled if you can invoke the action on every selected message.
-
A Cancel button
 to leave multiselect mode.
When you invoke a custom action on your selection, Unblu runs the action once, on all the selected messages together, and leaves multiselect mode. If the action sends a system message, the message states the action’s name and the number of messages you invoked it on.
Customizing multiselect mode
By default, the Select messages option is in the overflow menu of the control bar and the action bar. You can adapt multiselect mode with the following configuration and text properties:
-
com.unblu.agent.conversation.controlbar.multiSelectMessagesActionDisplayMode and com.unblu.agent.conversation.controlbar.multiSelectMessagesActionSortOrder: The display mode and sort order of the Select messages option in the Agent Desk control bar.
-
com.unblu.conversation.actionbar.ui.multiSelectMessagesActionDisplayMode and com.unblu.conversation.actionbar.ui.multiSelectMessagesActionSortOrder: The display mode and sort order of the Select messages option in the conversation action bar.
-
com.unblu.agent.conversation.ui.btnMultiSelectMessages and com.unblu.conversation.actionbar.ui.actionBarMultiSelectMessages: The labels of the two Select messages options.
-
com.unblu.conversation.messaging.ui.colorSelectedMessageBackground: The background color of selected or hovered messages in multiselect mode.
-
com.unblu.conversation.messaging.ui.colorMultiSelectControlBarBackground: The background color of the multiselect control bar.
Reacting to custom actions
How you react to a custom action is up to you. The reaction can consist of a single operation, such as opening a particular page on your organization’s website. It could also initiate a process involving a dialog bot that helps participants complete a more complex series of steps.
Alternatively, you can build the reaction as an Aria flow instead of implementing it yourself. For more information, refer to Triggering Aria flows with custom actions.
When a custom message action is invoked on multiple messages, your integration receives a single CustomMessageActionBatchInvocationRequest outbound web API request for the whole selection. Invocations on multiple messages don’t generate webhook events in version 3 of the Unblu web API. In the Agent Embedded JS API, the invocation’s targetMessages property contains all the selected messages.
See also
-
For information on the web API endpoints for custom actions, refer to the CustomActions section of the Unblu web API reference.
-
For information on using custom actions with the Unblu JavaScript APIs, refer to the Floating and Embedded Visitor JS API references, and the Agent Embedded JS API reference.
-
For information on having a custom action run an Aria flow, refer to Triggering Aria flows with custom actions.
-
For information on creating and editing custom actions in the Aria interface, refer to Custom actions in the Aria interface guide.