Creating a single flow bot
This is a preview feature. It may be subject to change or removal with no further notice.
To enable preview features, set com.unblu.platform.enablePreview to true.
For more information on preview features, refer to the Unblu release policy.
A single flow Aria dialog bot runs exactly one agentic flow, with no intent routing or sub-flow orchestration. Unlike a multiflow bot, which routes between several specialized flows based on user intent, a single flow bot handles every interaction with the same flow. It’s the simplest type of Aria dialog bot to build.
In this tutorial, you build a working single flow bot from scratch. The bot greets the user. It then asks whether they want to look something up on a particular topic.
-
If the user answers Yes, the bot retrieves relevant content from a document store and asks a large language model (LLLM) to answer with that content as context.
-
If the user answers No, the bot asks them to state their question, then hands the conversation off to a human agent, including the question in the hand-off.
The flow you build will look something like this:

Each new node type is explained the first time it appears in the tutorial. The remaining node types are covered in Other node types at the end of this article.
For information on the Aria interface, creating dialog bots, and general canvas mechanics, refer to the Aria interface guide.
Prerequisites
To follow this tutorial, your Unblu account must have the following in place:
-
An Aria license. If the Aria entries don’t show up in the New bot menu, check with your administrator.
-
An Aria single flow agent dialog bot. For instructions, refer to New Aria single flow agent dialog bot.
-
At least one LLM credential configured in Aria. For instructions, refer to New credential.
-
A document store with at least one upserted document. For instructions on creating a document store, adding documents, and upserting them, refer to Document stores.
The default flow
Open the Flow canvas tab of your bot. The canvas displays the default flow: two nodes connected by an arrow.
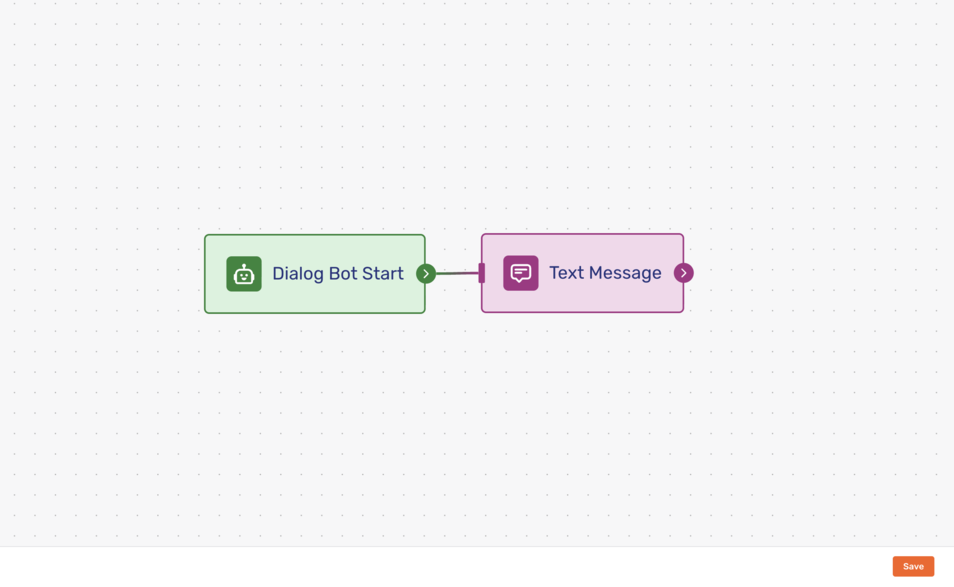
The following subsections describe each node and how to edit them. For general canvas operations such as connecting nodes or saving your changes, refer to Flow canvas in the Aria interface guide.
Dialog Bot Start
The first node is always the Dialog Bot Start node. It marks the entry point of the flow. A single flow canvas contains exactly one start node.
The Dialog Bot Start node populates the flow’s state with variables that describe the conversation, such as conversation_id, conversation_contextPerson_firstName, and conversation_locale. Downstream nodes can reference these variables to customize their behavior. State persistence is enabled automatically.
Double-click the node to inspect it in the node editor. To close the node’s editor again, click Cancel.
Text Message
The second node is a Text Message node. It sends a text message to the user. By default, the text is taken from the configuration property com.unblu.aria.dialogbot.singleFlowBotInitialMessage.
Replace the default greeting with something more specific to this tutorial:
-
Double-click the Text Message node to open its editor.
-
Replace the contents of the Text field with
Hi! Let me ask you a quick question to get the conversation started. -
Click Apply. This saves your changes and closes the editor.
Customize the flow
The default flow greets the user but doesn’t do anything else. The subsections below extend it with nodes that interact with the user.
Ask the question
After greeting the user, the bot asks them whether they need help looking something up. The Multichoice Question node displays a message with a set of selectable options and waits for the user to pick one.
-
Click the Add nodes toolbar button. In the Chat messages category, click Multichoice Question, then drag the new node onto the canvas to the right of the Text Message node.
-
Double-click the new node to open its editor.
-
Configure the fields as follows:
-
Question Text: The question to display to the user. For the purpose of this tutorial, ask whether the user has a question about the topic covered by the document you’re going to add. The field accepts variables, so you can use flow state variables, such as
conversation_contextPerson_firstNameandconversation_locale, to personalize the message. -
Text type: Whether the text is plain text or Markdown.
-
Options: The choices the user can pick from. Add two options:
-
The first has Label
Yes, Valueyes, and Primary on, to highlight Yes as the recommended answer. -
The second has Label
Noand Valueno.
The Value of the selected option is what downstream nodes see; the Condition node in the next subsection uses it to decide which branch to take.
-
-
Wait for Response: Whether the node pauses the flow until the user responds. Leave on (the default for question-type nodes).
-
Fallback text: Text to display in channels that can’t render the multichoice buttons. Leave empty for this tutorial.
-
Locale: A language override for the message. Leave empty for this tutorial.
-
-
Close the editor by clicking outside it.
-
Drag from the Text Message node’s right-edge connector to the Multichoice Question node’s left-edge docking bar to add the new node to the flow.
Forking the flow
The Multichoice Question node captures the user’s choice as a value, yes or no. The Condition node compares that value against one or more rules and routes the flow accordingly: each rule adds a branch, plus a final else output. This tutorial uses a single rule for a simple yes/no fork.
-
Click the Add nodes toolbar button. In the Logic category, click Condition, then drag the new node onto the canvas to the right of the Multichoice Question node.
-
Double-click the new node to open its editor and configure the default condition entry as follows:
-
Type: The data type of the values being compared. Keep the default,
String. The Condition node also supportsNumberandBooleancomparisons. -
Value 1: The value to compare against. Refer to the user’s response from the Multichoice Question node using the canvas’s variable picker.
-
Operation: How the two values are compared. Keep the default,
Equal. The operations available depend on the data type selected in Type. ForString, the options areContains,Starts With,Ends With,Equal,Not Equal,Not Contains,Regex,Is Empty, andNot Empty. -
Value 2: The value to compare against Value 1. Enter
yes, which is the Value assigned to the Yes option in the Multichoice Question.
-
-
Close the editor by clicking outside it.
-
Drag from the Multichoice Question node’s right-edge connector to the Condition node’s left-edge docking bar to add the new node to the flow.
With our single rule, the Condition node has two outputs. The matched output (labelled 0 on the canvas) fires when Value 1 equals Value 2, that is, when the user picked Yes. The else output (labelled 1) fires when no condition matches, that is, when the user picked No. The next two subsections wire the bot’s behavior to each output.
The "no" branch — hand-off to a human
If the user picks No, the bot asks them to state their question and then hands the conversation off to a human agent. The user’s question becomes part of the conversation history, so the human agent can pick up where the bot left off.
The Text Question node displays a message and waits for the user to type a free-form answer.
-
Click the Add nodes toolbar button. In the Chat messages category, click Text Question, then drag the new node onto the canvas below the Condition node.
-
Double-click the new node to open its editor and configure the fields as follows:
-
Question Text: The question to display to the user. Enter
What’s your question? Your message will be forwarded to a human agent. -
Text type: Whether the text is plain text or Markdown.
-
Question Type: The type of answer expected from the user. Choose
Long Textso the user has space to write a multi-sentence question. The other options areShort Text,Number,Email,Phone,URL,Date,Time, andDate & Time, each enforcing its own validation rules on the user’s input. -
Hint: Placeholder text shown in the input field. Enter
Enter a question here. -
Min Characters: The minimum number of characters required.
-
Max Characters: The maximum number of characters allowed.
-
Additional Regex: An optional regular expression for additional input validation.
-
Declinable: Whether to make the question declinable. Leave off.
-
Wait for Response: Whether the node pauses the flow until the user responds. Leave on (the default for question-type nodes).
-
Fallback text: Text to display in channels that can’t render the input field. Leave empty for this tutorial.
-
Locale: A language override for the message. Leave empty for this tutorial.
-
-
Close the editor by clicking outside it.
-
Drag from the Condition node’s else output to the Text Question node’s left-edge docking bar to add the new node to the flow.
The "yes" branch — retrieval-augmented generation (RAG)
If the user picks Yes, the bot asks them what they want to look up. It then retrieves relevant content from a document store and hands both the question and the retrieved content to an LLM for a grounded answer.
The branch uses four nodes:
-
A Text Question to capture the user’s request
-
A Retriever to fetch relevant chunks from the document store
-
An LLM to generate an answer grounded in those chunks
-
A Text Message to send the answer to the user
First, add the Text Question node.
-
Click the Add nodes toolbar button. In the Chat messages category, click Text Question, then drag the new node onto the canvas above the Condition node.
-
Double-click the new node to open its editor and configure the fields:
-
Question Text: Enter
What would you like to know? -
Question Type: Choose
Long Text. -
Hint: Enter
Type a question. -
Leave the other fields at their defaults.
-
-
Drag from the Condition node’s matched output to the new Text Question node’s left-edge docking bar.
Next, add the Retriever node.
-
Click the Add nodes toolbar button. In the Documents category, click Retriever, then drag the new node onto the canvas to the right of the Text Question node.
-
Double-click the node and configure the fields:
-
Knowledge (Document Stores): The document stores to retrieve information from. Click the picker and select your document store. Only stores that have been upserted appear in the picker.
If your store isn’t there, ensure it’s been upserted. For more information refer to Document stores.
-
Retriever Query: The Retriever uses this query to search the document store’s vector index for the most relevant chunks.
Use the canvas’s variable picker to select the
questionoutput of the Text Question node. To access the variable picker, type{{in the field. -
Output Format: The format of the retrieved content. Keep the default,
Text. The other option,Text with Metadata, includes per-chunk metadata (such as source and score) in the output.
-
-
Drag from the Text Question node’s right-edge connector to the Retriever node’s left-edge docking bar.
Then, add the LLM node. The LLM node is responsible for contacting the LLM and generating a response. However, it doesn’t send the response itself. You have to add a text node or the like to send the user a message with the response.
-
Click the Add nodes toolbar button. In the AI category, click LLM, then drag the new node onto the canvas to the right of the Retriever node.
-
Double-click the node and configure the fields:
-
Model: The chat model to use. Pick one from the dropdown. The available models depend on the credentials configured in Aria. After you pick a model, model-specific sub-fields appear (such as temperature and max tokens); their available range varies by provider.
-
Messages: Role/content pairs added to the conversation before the model is called. Add one entry with Role
Systemand Content:You're a helpful assistant talking to <user's first name>. Use the following information to answer their question: <retriever output> If the answer isn't in the information above, say so honestly.Replace
<user’s first name>with a variable reference to theconversation_contextPerson_firstNameflow-state variable, and<retriever output>with a variable reference to the Retriever node’s output (retrieverAgentflow_0), using the canvas’s variable picker. -
Enable Memory: Whether the LLM sees the prior conversation as context. Leave on (default). With memory on, the LLM also sees the user’s question from the Text Question node.
-
Memory Type: Which prior messages to include. Keep the default,
All Messages. The other options areWindow Size(last N messages),Conversation Summary(a running summary), andConversation Summary Buffer(summarize when the token limit is reached).
-
-
Drag from the Retriever node’s right-edge connector to the LLM node’s left-edge docking bar.
Finally, add the Text Message node. This is necessary because, as mentioned above, the LLM node doesn’t send a response. It merely generates the response.
-
Click the Add nodes toolbar button. In the Chat messages category, click Text Message, then drag the new node onto the canvas to the right of the LLM node.
-
Double-click the node and configure the fields:
-
Text: The message to send to the user. Use the canvas’s variable picker to select the
llmAgentflow_0output of the LLM node. -
Leave the other fields at their defaults.
-
-
Drag from the LLM node’s right-edge connector to the new Text Message node’s left-edge docking bar.
Finishing the dialog
Both branches end with a Finish Dialog node, which closes the bot’s turn and signals what should happen next. The exact effect varies by boarding phase; for the details, refer to Dialog bots.
First, add a Finish Dialog node at the end of the "yes" branch.
-
Click the Add nodes toolbar button. In the Flow control category, click Finish Dialog, then drag the new node onto the canvas to the right of the reply Text Message.
-
Double-click the node and configure the field:
-
Reason: The reason the dialog ends. Keep the default,
Solved. The other options areHand Off(pass the conversation to a human agent or the next bot in the boarding queue) andAborted(stop the boarding process without success).
-
-
Drag from the reply Text Message node’s right-edge connector to the Finish Dialog node’s left-edge docking bar.
Add another Finish Dialog node at the end of the "no" branch and configure its field:
-
Reason: Choose
Hand Off. This passes the conversation to a human agent. The user’s question, captured by the preceding Text Question, is already in the conversation history, so the agent picks up with full context.
Drag from the Text Question node’s right-edge connector to the Finish Dialog node’s left-edge docking bar. Finally, click Save on the canvas toolbar to save the flow. Without saving, all your changes are lost when you navigate away from the Flow canvas tab.
Try it out
To test your new single flow bot, you must enable it in a conversation template. To enable the bot, open the Account Configuration interface, navigate to the conversation template you want to use, and add the bot to the conversation template’s conversation bots. Use one of the following configuration properties:
For the full configuration details, refer to Setting up a custom dialog bot.
Start a conversation through your normal visitor-facing path, such as the Floating Visitor UI. Make sure the conversation uses the conversation template you added the bot to.
-
To test the "yes" path, pick Yes when the bot asks the multichoice question. When the bot asks
What would you like to know?, type a question that your document store can answer. The bot replies with an LLM-generated answer grounded in the retrieved content, then closes the dialog. -
To test the "no" path, start a new conversation and pick No when the bot asks the multichoice question. After you enter your question, the bot hands the conversation off to a human agent.
Troubleshooting
If the Model dropdown was empty when you set up the LLM node, no LLM credential is configured in Aria; refer to New credential.
If the document store dropdown was empty when you set up the Retriever node, your document store hasn’t been upserted, or it has no upserted documents; refer to Document stores.
If the bot doesn’t engage in the conversation, check that the bot is Active (in its General tab) and that it’s listed in one of the conversation template’s bot-list properties.
Other node types
The canvas supports numerous types of node that weren’t used in the tutorial above.
Flow control
The only flow control node available on a single flow canvas is the Finish Dialog node, covered in Finishing the dialog. The Execute Flow node for invoking subflows isn’t available in single flow canvases.
Logic
The Condition node was covered in Forking the flow.
The Iteration node creates an iteration block on the canvas; nodes placed inside the block run once per item in an input array. This is useful for fan-out operations, such as processing a list of search results.
The Loop node sends the flow back to a previously visited node, allowing the bot to repeat a section of the flow. You configure which node to jump back to. This is useful for retry logic or multi-turn dialogs that need to revisit earlier steps.
AI
The LLM node was covered in The "yes" branch — retrieval-augmented generation (RAG).
The Agent node lets an LLM dynamically choose and use tools from the orchestrator’s predefined registry to accomplish a goal, with multi-step reasoning. You configure the model, the system prompt, and which tools from the registry to make available. This is useful for bots that need to pick from a set of capabilities at runtime. (The Tool node uses the same registry but invokes a single chosen tool deterministically at design time.)
The Condition Agent node is an agent-driven version of the Condition node. Instead of comparing values with fixed operations, you describe the conditions in natural language and the LLM decides which branch matches. This is useful when the routing logic is too complex for static comparisons.
Chat messages
The Text Message, Text Question, and Multichoice Question nodes were covered in the tutorial.
The Rating Question node displays a question with selectable rating options and waits for the user to pick one. You configure the question text and the rating options (label/value pairs, same shape as Multichoice).
The Card Message node can contain an image, body text, action buttons, and quick replies. You configure each of these elements separately.
The List Message node sends a message with a header and a vertical list of items, each of which can have its own action button. You configure the header text and each list item.
The File Message node sends a file, such as a PDF or image, to the user, optionally with a caption and quick replies. You configure the file reference and any caption text.
Integrations
The HTTP node sends an HTTP request and exposes the response to nodes further along the flow. You configure the URL, method, headers, body, and authentication.
The Custom Function node executes a snippet of JavaScript code. You write the code inline and pass it variables from the flow state; the function’s return value is available to nodes further along the flow. This is useful for transforming data, formatting strings, or applying business logic that isn’t worth building a separate service for.
The Tool node invokes one of the tools from the orchestrator’s predefined registry. (The Agent node uses the same registry but with the LLM picking at runtime.) You configure the tool to invoke from a dropdown of registered tools and fill in its input arguments.
See also
-
For more information on the Aria interface, refer to the Aria interface guide.
-
For an overview of bot integration in Unblu Spark, refer to Bot integration.
-
For more information on dialog bots, refer to Dialog bots.